Installing Software and Drivers
Before you can use the DyIO you’ll need to install Bowler Studio for your computer. Even if you plan to use Eclipse, Processing, or some other language entirely it is still a good idea to install BowlerStudio for your platform because it also installs drivers for the DyIO itself.
Do not plug in DyIO on Windows before installing drivers.
On a windows computer it is important to run the installer before plugging in the DyIO. This prevents windows from auto-installing a correct driver.
If you did this and are failing to connect to your DyIO then
- Go into the
Device Manager - Right Click on
DyIO v.3 - Select
Uninstall Driver - Unplug the DyIO
- Continue Below
Making sure everything works
Try Using BowlerStudio
IF you’re viewing this in a web browser thats cool but it will make more sense in BowlerStudio because you can just click “Run” and get instant gratification.
We’re gonna use this simple groovy script to check the status of our DyIO. If you don’t have a DyIO plugged in BowlerStudio should prompt you when you try and run the gist below. If everything worked out you should see the status of all the DyIO’s channels, its Serial Number, and some additional information.
If everything’s kosher feel free to move onto additional steps.
Common MAC problems
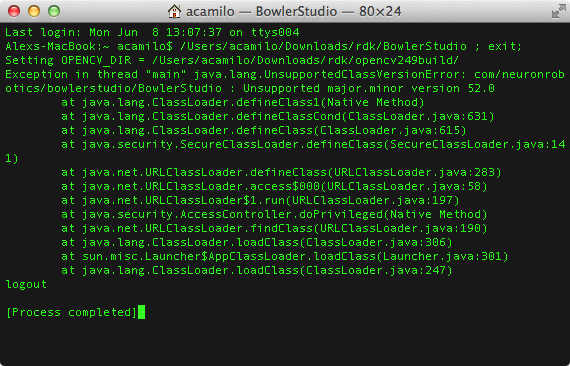
Wrong Java Version
Sometimes, especially if you’re using an older mac, the version of java is pretty old and needs to be updated. If you’re getting the error below then you need to click on this link and install java version 8 or newer.
Custom installs and special cases
Just the UDEV rules please
Java on the Raspberry Pi
Java on the Beagle Bone Black
Beaglbone Black/Green Getting Started:
Visit the getting started guide and get your Beabgleboard up and running. http://beagleboard.org/getting-started
SSH Access
It is important to have SSH access on your Beaglebone for installing Java and building BowlerStudio. First get SSH access on your Beaglebone Black/Green the guide below will help with that no matter which operating system you are using.
Linux / UNIX
- Open a Terminal emulator
- Type : ssh root@192.168.7.2
- When prompted for a password just hit enter the root password is blank by default on the Beaglebone
Windows
- Download and Install PuTTY Telnet Client: http://www.putty.org/
- Install and Open PuTTY
- Select SSH in the configuration dialog, type: 192.168.7.2 for the address and click open
- Type in root for the username, the password is blank by default so just hit enter
Mac OS X
- On Mac OS X go into the /Applications/Utilities and open Terminal.app
- Type : sudo ssh root@192.168.7.2
- Type your user password
- When prompted for a password just hit enter the root password is blank by default on the Beaglebone
Setting Up a New User Account
For security purposes and preventing catastrophic failures with the operating system it is good practice to make a dedicated user account for running your applications and programs on the Beaglebone Black/Green. During this part of the tutorial we will go over adding a new user to the Beaglebone Black.
First Open an SSH session using the guide above. For this process we need to login as root, as mentioned before the default password for root is blank so type nothign when prompted for it.
To create a new user type the following and follow the instructions on the screen:
shell
sudo adduser newusername
Now that we have created a new user account we need to add it to the sudoers file so the user can perform tasks as administrator.
Type the following to add your new user to the sudoers file:
shell
sudo yournewusername sudo
Installing Java 8 JDK on Beaglebone Black/Green
From a Linux PC These Instructions Require a PC Running Linux, they might work with OS X But untested
Installing on Debian (ships with Beaglebone)
The Neuron Robotics RDK and BowlerStudio require the latest Java 8 JDK/JRE for ARM from Oracle.
- First on your local machine download the latest Java 8 package for Linux ARM v6/v7 Hard Fload ABI found here: http://www.oracle.com/technetwork/java/javase/downloads/jdk8-downloads-2133151.html
- Copy the Java archive to the home directory of the root user on your Beaglebone Black/Green. Open up a Terminal session on your local machine and type with the following command:
shell
sudo scp /path/to/java/archive root@192.168.7.2:/path/to/user/home
3. Once the file has finished copying over to the home directory of your user account on the Beaglebone open up a Terminal session and SSH into the Beaglebone
4. Once inside the SSH session on the Beaglebone Black/Green unpack the java archive:
shell
gunzip jdk-8-linux-arm-vfp-hflt.tar.gz
- Copy Upack the tar into the /usr directory:
shell
 sudo tar xf jdk-8-linux-arm-vfp-hflt.tar -C /usr
- Next update the Java path by adding the following lines to the .bashrc file
shell
sudo nano ~/.bash_profile
Add the follownig to the ~/.bash_profile and save it
shell
#### JAVA 1.8.0 #######################
    export JAVA_HOME=/usr/jdk1.8.0_60
    export PATH=$PATH:$JAVA_HOME/bin
 #### JAVA 1.8.0 #######################
Then Run
source ~/.bash_profile
- Finally to test the install and check the Java version:
shell
java -version
It should print back something like this:
shell
java version "1.8.0_60"
Java(TM) SE Runtime Environment (build 1.8.0_60-b27)
Java HotSpot(TM) Client VM (build 25.60-b23, mixed mode)
Installing Gradle 2.7 on Beaglebone Black/Green
- Open a Terminal session
- Access the Beaglebone over SSH under the user account you created earlier inthe tutorial
- Now download the latest Gradle
shell
cd /tmp
sudo wget https://services.gradle.org/distributions/gradle-2.7-all.zip
4. Now to unpack the archive, create the install directory, and move the contents of the archive tot he directory
shell
unzip gradle-2.4-all.zip
sudo mkdir -p /opt/gradle/2.4
sudo mv gradle-2.4/* /opt/gradle/2.4/
sudo ln -s /opt/gradle/2.4/ /opt/gradle/current
- Now to add the proper PATH, open your bash profile:
shell
sudo nano ~/.bash_profile
Add the following to the file: ```shell #### GRADLE 2.7 ###########################
export GRADLE_HOME=/opt/gradle/current
export PATH=$PATH:$GRADLE_HOME/bin
GRADLE 2.7
```
Then Run
source ~/.bash_profile
- Test installation and check version:
gradle -version
Installing Maven 3.3.3 on Beaglebone Black/Green
- Open a Terminal session
- Access the Beaglebone over SSH under the user account you created earlier inthe tutorial
- Now download the latest Maven
shell
cd /tmp
sudo wget http://apache-mirror.rbc.ru/pub/apache/maven/maven-3/3.3.3/binaries/apache-maven-3.3.3-bin.tar.gz
- Now to unpack the archive, create the install directory, and move the contents of the archive tot he directory
shell
sudo tar -xvzpf apache-maven-3.3.3-bin.tar.gz
sudo mkdir -p /opt/maven/3.3.3
sudo mv apache-maven-3.3.3/* /opt/maven/3.3.3/
sudo ln -s /opt/maven/3.3.3/ /opt/maven/current
- Now to add the proper PATH, open your bash profile:
shell
sudo nano ~/.bash_profile
Add the following to the file:
```shell #### MAVEN 3.3.3 #########################
export MAVEN_HOME=/opt/maven/current
export PATH=$PATH:$MAVEN_HOME/bin
MAVEN 3.3.3
```
Then Run
source ~/.bash_profile
- Test installation and check version:
mvn -version
Installing on Ubuntu
Coming Soon……
From a Mac